


You will need
Ingredients:
Tools:
- 450g milk chocolate
- 450g white chocolate
Tools:
- Spatulas for tempering chocolate
- Polycarbonate mold (you can use any diameter)
- Pastry bag
- Pyrometer
- A burner or a hair dryer for heating the surface
- Saucepan
- A stationery knife or a tool with a blade
- The "metal ball" tool
- Surface for tempering
Process
Step 1: Temper the milk chocolate
Place the chocolate in a bowl and melt it in the microwave to a temperature of 45 degrees. We recommend doing this in pulses, for 10-20 seconds, so that the chocolate does not overheat and burn.
Cool the working room to 23 degrees and maintain this temperature. Next, pour 2/3 of the chocolate on a cold stone surface, cool the chocolate from 45 to 27 degrees, distributing it over the surface and collecting it back into the total mass. Then pour the cooled part back to the bowl and mix until the operating temperature is 31-33 degrees.
Note:
The purpose of tempering is to make the cocoa butter in chocolate take a stable crystalline form – this will make the chocolate hard, crisp and will give a beautiful shine to the product.
Note:
The purpose of tempering is to make the cocoa butter in chocolate take a stable crystalline form – this will make the chocolate hard, crisp and will give a beautiful shine to the product.
Step 2: The first layer of hemispheres
Before filling out the form, be sure to measure the temperature of the chocolate after tempering (it should be 31-33 degrees). Pour the chocolate into a pastry bag for convenience, and fill the polycarbonate mold.
Tap the form and leave it for 2 minutes.
Turn the mold over, tap again to knock down the excess chocolate.
Turn the mold over, tap again to knock down the excess chocolate.
Cut off the remaining chocolate with a spatula so that the shape on top remains clear - this will give an even edge to the hemispheres.
Step 3: Temper white chocolate
After that temper white chocolate according to the same principle as milk chocolate. First, heat the chocolate to 40-45 degrees, then cool 2/3 of the chocolate on the surface to a temperature of 25-26 degrees. Add back to the bowl and stir until the working temperature is reached. For white chocolate, it is 30 degrees.
Step 4: The second layer of hemispheres
Pour a layer of white chocolate in the same form that you filled with milk chocolate. Wait for 2-3 minutes and turn the mold over, repeat the same steps as last time: tap the mold to knock off the excess chocolate, cut the excess chocolate with a spatula.
Step 5: Cooling
Leave the mold with two layers of chocolate for 8 hours at a temperature of 21-23 degrees. Another option is to put it in the refrigerator for 30-60 minutes.
Important note:
If you did everything right during the tempering, chocolate hemispheres will be easy to detach from the polycarbonate mold when ready.
Important note:
If you did everything right during the tempering, chocolate hemispheres will be easy to detach from the polycarbonate mold when ready.
Step 6: Assemble the hemispheres
After you have taken the finished hemispheres out of the mold, heat the bottom of the saucepan with a hair dryer or a burner. Put each hemisphere on the heated surface and then glue them together. Next, tighten the seam as shown on the photo.
Step 7: Creating a Texture
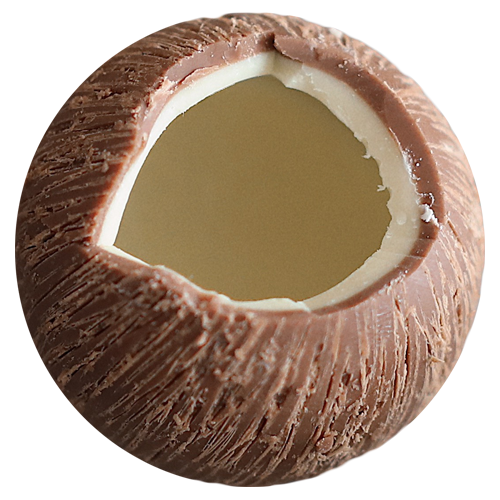
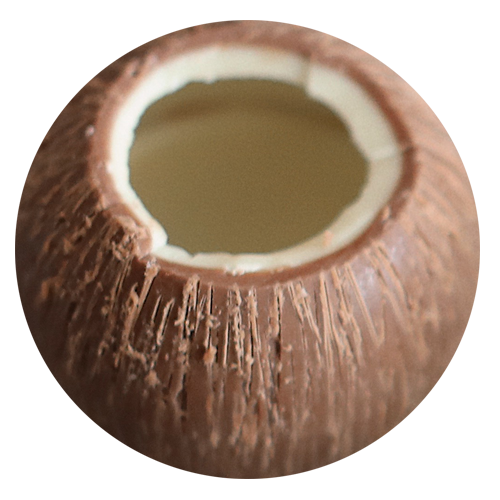
Using a knife, start making small "scratches" on the surface of the chocolate spheres.
Idea:
Some of the coconuts can be left whole and some can have the upper part cut off.
Idea:
Some of the coconuts can be left whole and some can have the upper part cut off.
Finally, the final touch: heat the tool with a metal ball and make small "dents" in the bottom of the coconut to give it even more naturalness.
Hint:
If you want a coconut inside to be more white - you can add a white fat-soluble dye after tempering the chocolate.
Hint:
If you want a coconut inside to be more white - you can add a white fat-soluble dye after tempering the chocolate.
So how was it? )
We are super excited to see your results. Send us a photo and some comments via email (mail topic - "coconuts tutorial result") or Instagram DM.
Or share them in Instagram mentioning "Coconuts. By me, on @tortikannuchka special technique".
Contact us:
hello.tortikannuchka@gmail.com
We are super excited to see your results. Send us a photo and some comments via email (mail topic - "coconuts tutorial result") or Instagram DM.
Or share them in Instagram mentioning "Coconuts. By me, on @tortikannuchka special technique".
Contact us:
hello.tortikannuchka@gmail.com
If you still have questions about the Chocolate Coconuts tutorial, check out the detailed video.